ActionTask Development
ActionTasks Overview
ActionTasks use a functional page design, graphical control element type (GUI), called an accordion. It is a vertically stacked list of items with containers for functions called panels. Each item can be 'expanded' or 'stretched' to reveal the content associated with that item. One or more than one item can be expanded at a time, depending on the workspace needs.
If there is content in a container, it is dark grey; no content is indicated in light grey.
ActionTasks define the commands used on the local system or RSRemote to carry out a specific test or action, such as pinging a remote server. They include functional logic required to achieve a step in a process but are normally context-free.
Runbooks are essentially composed of multiple ActionTasks in defined sequences. ActionTasks:
- Can also be executed independently by clicking on the ActionTask URL link.
- Often use adaptors and gateways (connectors), which provide connectivity to network devices, systems, and applications using a variety of methods, protocols, and APIs.
ActionTask Components
An ActionTask is comprised of several functional components, each reflecting an individual "execution step":
- Preprocess
- Content
- Parser
- Assess
The Preprocessor Assessor scripts and Parser are optional. Only the Content script or Command Line command (with arguments) is necessary to have an executable ActionTask.
- The Content:
- The script code and the Assessor depend on the type of ActionTask.
- The script code is executed by the RSRemote(s), while the Assessor is executed by the RSControl.
- OS and REMOTE-type tasks use the Content - Groovy tabs; ASSESS-type tasks contain only an Assessor component.
This distinction between ActionTask components allows Resolve Actions Pro to balance load and scale effectively. The goal is for the RSRemote(s) to accomplish a significant amount of the workload and the RSControl to manage execution and interpret the results.
At the most basic level:
- The RSRemote executes a command or script.
- Returns the raw results to the RSControl (Assessor).
- Contains business logic to determine whether the execution was successful and whether the results are good or bad.
- Contributes to the logical flow of the Runbook.
There are two actions:
- At the start of each ActionTask, RSControl operates the Preprocessor task component that "preps" the task, before sending off input data and Content scripts to the RSRemote for execution.
- After the RSRemote finishes Content work, it returns the RAW data to RSControl for the Parser and Assessor to format and evaluate task results.
The intrinsic variables used in task execution, such as RAW and RESULT, are listed in Reserved Variables. For more information on different variable types used during process execution, see Runbook Variable Types.
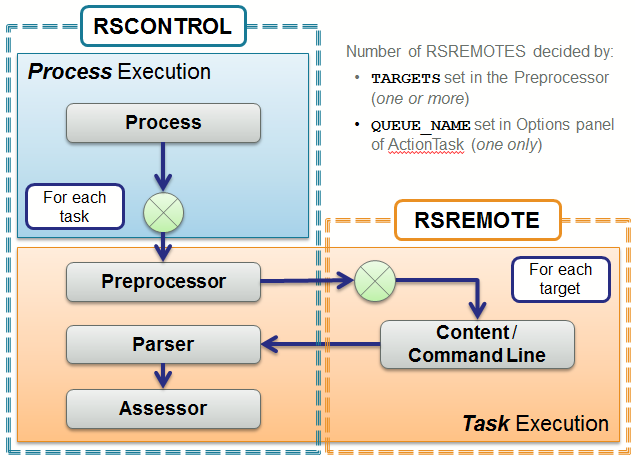
Figure 1 – Process Flow Execution
To create and save an ActionTask, enter the name, module, menu path, type, and timeout. These requirements for an ActionTask are separate from the required Content or Command-Line material for valid execution.
Accessing ActionTasks
Accessing My ActionTasks
To see your assigned tasks:
- Go to Main Menu > Content Management > My ActionTasks. The ActionTask screen displays, containing the ActionTasks, assigned to your role.
- From the ActionTasks list, click the View Details icon next to the ActionTask listing you wish to explore. If you want to open several ActionTasks in separate browser tabs you can:
- Middle-click the ActionTask name or on the View Details button;
- Right-click the ActionTask name or on the View Details button which expands a drop-down option, Open link in a new tab as shown in Figure 3;
- Use the tabs on the top to select the ActionTask component that you want to view.
To view content in the system, you may need to have certain access rights or administrative roles assigned.
Accessing All ActionTasks
To access All ActionTasks, available in the system, follow the same steps as for accessing My ActionTasks.
- Go to Main Manu > Content Management > All ActionTasks. The following screen displays.
- From the ActionTasks list, click the View Details icon next to the ActionTask listing you wish to explore. If you want to open several ActionTasks in separate browser tabs you can:
- Middle-click on the ActionTask name or on the View Details button;
- Right-click the ActionTask name or on the View Details button which expands a drop-down option Open link in a new tab.
Searching ActionTasks
There are three options to search an ActionTask:
- Search by name in the Search field.
- Advanced search: Clicking on the down-arrow in the Search field opens a new window with the Advanced Search option. It allows you to search based on the following criteria: Name, Namespace, Active, Reference, Summary, Assigned to, Created On, Created By, Updated On, Updated By.
- Brawse the Menu Path or the Namespace panels and use their navigation and then scroll through the tasks list to find the task.
Creating an ActionTask
You can create a new ActionTask from either the My ActionTasks screen or from the All ActionTasks screen. To do it:
Go to Main Manu > Action Definition > My ActionTaksks or All ActionTasks.
On the ActionTasks screen, click the New button.
In the New ActionTask window, fill in the required fields in the General screen. The fields Namespace and Name are mandatory.
The following table shows more information about the definition of the fields.
Field Description Namespace This is a label for containers. It can be used for documentation, Runbooks, ActionTasks, or Wiki documents. There are no restrictions. Menu Path Folder location of ActionTask. Name Name of the ActionTask. Restricted. Type ASSESS
REMOTE
OS
BASH
CMD
CSCRIPT
POWERSHELL
PYTHON
EMBEDDED_PYTHONTimeout Defines the period of time for sleep time, start time, etc. The default is 300. If you are executing a long ActionTask, it can be set to prevent stopping.
NOTE: The default timeout period is set to 15 minutes (900 seconds) explicitly for the following ActionTasks in the System namespace:
git save action task#resolve
git update action tasks from git#resolve
git save wiki doc#resolve
git update wiki docs from git#resolve
For further information on how to use Git in Actions Pro, see Git Synchronization.Assigned To The User, assigned to maintain the ActionTask, which will display in their My ActionTasks menu list.
Select a User by clicking the Search icon next to the Assigned To field.Summary Brief description of the ActionTask displayed in search lists. Description A longer description detailing the ActionTask function. Active (checkbox) Enable or disable the ActionTask from execution; if disabled, it affects any referencing Runbooks to fail to execute (ActionTask Lists display "Active" status as a separate column). Log Raw Result (checkbox) Used to log or discard the RAW ActionTask results once it has been processed. Display (checkbox) Always display task results in Worksheet. Click the Save button to save changes or select Save from File drop-down menu or press Ctrl + S.
After saving the ActionTask, click on:
- the Roles tab to add or remove user roles (access rights) required to execute the task (default: action_execute). Note that the roles must already exist in the system to have permission to execute the ActionTask.
- and the Options tabs to add or remove pre-defined options that specify values for common variables.
- The General tab contains an overview of the ActionTask, including its name, location in the organizational structure, summary/description, access rights, tags, and options.
Edit and Delete an Existing ActionTask
Editing an ActionTask
You can make changes to each tab by using the Edit icon.
To change the configuration of an existing ActionTask:
- Go to Content Management > My ActionTasks or Content Management > All ActionTasks.
- In the list, click the ActionTask that you want to modify.
The latest version of the ActionTask loads in a read-only view. - Click the Edit icon.
- Use the tabs on the top to select the ActionTask component that you want to edit, for example, Parameters.
- Make the necessary changes and click the Save button (or select Save from File drop-down menu or press Ctrl + S).
If any part of the ActionTask has been modified but not yet saved, an asterisk * will appear next to the ActionTask name as a signal that changes are unsaved.
Deleting an ActionTask
To delete an ActionTask, select it either in the All ActionTasks or in the My ActionTasks lists and click the Delete button. This is a permanent deletion and content cannot be restored later. To delete multiple action tasks at once, press CTRL, select all necessary content from the list, click Delete, and then confirm the deletion.
The selected ActionTasks disappear from the list and is permanently deleted from the database.
Create a Copy of an ActionTask
There are two ways to create a Copy of an ActionTask:
- From All ActionTasks or My ActionTasks page - Copy
- From edit mode in ActionTask Builder tool - Save As
Copy ActionTask
- Navigate to the All ActionTasks or My ActionTasks page and select a task.
- Click on the Copy button, see Figure 10.
- Provide a new Namespace and/or new Name for the new ActionTask.
- If there is an already existing task with the same name in the same namespace, you can choose the Overwrite option. It overwrites the existing ActionTask.
Save As ActionTask
To change the configuration of an existing ActionTask and save it as a new ActionTask.
- Go to the Action Definition menu > My ActionTasks or All ActionTasks.
- From the ActionTasks list, click the "View Details" icon next to the ActionTask you wish to save as a new task.
- Click the Edit icon in the ActionTask Builder tool.
- Apply any necessary changes required for the new task and click File > Save As.
- Make the necessary changes in the ActionTask's Namespace or Name or both and click Save As New ActionTask. note
The Name or the Namespace for the new ActionTask must be unique within the Actions Pro instance.
- A screen with the new ActionTask displays.
Move/Rename an ActionTask
Similar to the Copy operation the Name or the Namespace for the new ActionTask must be unique within the target module. Move/Rename option provides the ability to change the Namespace or the Name of the selected ActionTask. You can do this from two places:
- All ActionTasks or My ActionTasks page- Move/Rename button;
- Move/Rename drop-down option in File menu in ActionTask Builder read-only mode;
Move/Rename from All ActionTasks or My ActionTasks
- Navigate to the All ActionTasks or My ActionTasks page and select a task.
- Click on the Move/Rename button, see Figure 10.
- Provide a unique Namespace if you want to move the ActionTask and a new Name if you want to rename it. Changing both is also possible.
- Click Move/Rename.
- Provide a unique Name or Namespace or both to change the location or the name of the selected ActionTask.
- If you want to do a bulk change to several ActionTasks, select the required with CTRL and click on the Move/Rename button. In this case, you are prompted to provide the new namespace where the tasks need to be moved.
Move/Rename from the File menu in ActionTask Builder read-only mode
Refer to Table 6 and Figure 20 for detailed steps.
Properties
The Properties page shows all properties defined in Actions Pro. PROPERTY variables are global read-only variables. ActionTask Property values are convenient as default values for parameters in ActionTasks or assigned in the Runbook. PROPERTY variables are useful because they do not cause memory leaks, as INPUT and OUTPUT variables might. See Input and Outputs and Other Parameter Types with regards to other ActionTask variables.
- They store common values (usernames, passwords, directory paths, and IP addresses) in the database for reference by any ActionTask in any Runbook.
- Property values are constant and can be stored in one place instead of hard-coded into each task.
- Properties can be also be encrypted to hide their values from Actions Pro users.
These Properties are different from Runbook properties, which are configuration options for an automation model.
- Model-level properties can be set using "Edit Inputs" in the START element.
- They can be set from the Action Definition main menu in the Properties Definition menu item, which displays the ActionTask Properties List.
Accessing the Properties Page
Go to the Action Definition menu and select Properties.
The Properties screen displays.
The following gives an explanation of the button and column names available on the Properties screen:
| Field | Description |
|---|---|
| New (button) | Click this to create a new property. As properties may contain values specific to a particular development or production environment, it is recommended that they are exported with the environment to allow values to be restored if overwritten. |
| Delete (button) | To delete a property, select it from the list and click the Delete button. |
| Name | The Property name that is referenced from within ActionTasks, by literal substitution in code: $PROPERTY{NAME}. |
| Type | "Plain" or "Encrypted", which are stored encrypted in the database and never displayed in Actions Pro in clear text. |
| Value | The Property value (hidden as it is typed if encrypted), stored as string. The symbol length of the encrypted value is not revealed either, the displayed asterisk * symbols are always 5. |
| Module | The module or namespace of the property, chosen from existing modules in the drop-down menu or new module name entered in the field |
| Updated On | Lists the latest update time. |
The System Information icon opens Created On, Created By, Updated By, System ID detailed information.
Advanced Search for Properties
If a complex search criterion, that combines several conditions, needs to be applied, use the Advanced search. Clicking on the triangle button in the Search field opens a new window with the Advanced Search option. The form contains the following criteria: Name, Type, Module, Created On, Created By, Updated On, Updated By.
Creating and Editing a Property
Creating a new Property
- On the Properties screen, click the New button. A Property pop-up window displays.
- Fill in the required fields and click Save.
The following table explains the property fields.
| Field | Description |
|---|---|
| Name | The Property name that is referenced from within ActionTasks, by literal substitution in code: $PROPERTY{NAME}.The valid characters are: alphanumerics, ‘_' (underscore), and '.' (period) . |
| Module | The module or namespace of the property, chosen from existing modules in the drop-down menu or new module name entered in the field. |
| Type | "Plain" or "Encrypted", which are stored encrypted in the database and never displayed in Actions Pro in clear text. The symbol length of the encrypted value is not revealed either, the displayed asterisk * symbols are always 5. |
| Value | The Property value (hidden as it is typed if encrypted), stored as string. |
Editing an Existing Property
- To edit an existing Property, click the Edit icon next to it. The Property edit dialog box displays. It is the same as the one on Fugure 18 above.
- Make the necessary changes and click Save.
Newly created properties or changes to existing properties are immediately available in the Properties list.
Changing the value of a property with type "encrypted" is not possible after being saved. Encrypted value fields are not editable in edit mode.
Other Variable Types in ActionTasks
GLOBALS, WSDATA, and PROPERTY variables are available to ActionTasks for data handling, although less frequently used than INPUTS, OUTPUTS, and FLOWS. PROPERTY variables are global variables that can be accessed by any ActionTask in any Runbook. PROPERTY variables are read-only in ActionTasks, and therefore are only accessible through $PROPERTY{NAME}. They can be set in the Properties Definition menu item in the Action Definition main menu.
When you specify an Actions Pro property as a task parameter, use the correct syntax, which is
$PROPERTY {PROPERTY\_NAME}
Make sure there are no white spaces anywhere, otherwise, the task will not be imported properly.
GLOBALS variables are accessible to all tasks in a Runbook at all times, regardless of position, but are only available in the Preprocessor and Assessor. WSDATA variables are saved to the Actions Pro database. They work similarly to FLOWS, but require a database read and write when accessing and saving. It is therefore advisable to use FLOWS instead of WSDATA (and usually in place of GLOBALS as well).
Two other special variables are important to ActionTasks. The RAW variable is the raw data from RSRemote execution of any ActionTask Content (a Groovy script for most ActionTask types) that is returned to RSControl for the parsing and assessment. The LOG variable can assist in debugging ActionTasks. The other intrinsic variables used in task execution are listed in Reserved Variables.
Prior to v6.4, there were also CNS (Common Naming System) variables which are now deprecated. See v6.3 Documentation > ActionTask Development for more details.
PARAMS Value Precedence
PARAMS is one of the special variables that provides a context for passing parameters between ActionTasks. PARAMS is a string hashmap that can be used to store values flowing through a Runbook, from task to task. Each task may add, update, and remove variables within the PARAMS context along the way as required by the Runbook.
PARAMS is unique to an automation pathway or flow (See Automation Model). Two different concurrent flows may have different values stored in the PARAMS context. PARAMS is copied for each executed ActionTask, and can subsequently be independently modified by each succeeding ActionTask Preprocessor and Assessor.
The special variable FLOWS must be explicitly inserted or removed by Preprocessors or Assessors. The variables in the PARAMS context are automatically initialized by Actions Pro. Values are inserted into PARAMS for each input parameter defined for the ActionTask. The value that is inserted for the input parameter (identified by its name) is determined by the following value precedence:
| Types | Defined At | Descriptions | Comments |
|---|---|---|---|
| PARAMS Variables | Auto-Populated or inserted by Assessors / Preprocessors | Existing variables in PARAMS | If a PARAMS variable already exists, the existing value is used and not modified |
| User Input | Updated by the user before the request is submitted | User manually input or update the value | The execute request parameter values are modified by the user before the request is submitted |
| Predefined Values | Runbook Task Properties or Wiki Tags | Predefined parameter values in the Runbook or Wiki | The ActionTask properties in the runbook automation model or the wiki action tags, contain predefined values for parameters |
| Default Value | ActionTask Parameter definition | Default ActionTask parameter value | The default ActionTask parameter value |
PARAMS and INPUTS variables
PARAMS are values "entering" a Runbook from an outside source (whatever initiated the Runbook), such as a form on a wiki document page. INPUTS are used to pass values to a task and either set in automation or when running a task manually. INPUTS can be assigned values from multiple sources such as OUTPUTS, PARAMS, FLOWS, WSDATA, or predefined constant values. INPUTS are provided to ActionTask and are accessible in the Preprocessor, Content, and Assessor; OUTPUTS get populated by the Assessor and copied to the next task INPUT variables if specified (otherwise simply discarded).
A good practice is to set INPUTS from PARAMS explicitly in automation. Because of various issues (even minor changes such as default values or inserting variables), protect your work by mapping. Also, always define INPUTS (again, mapping helps). INPUTS that are not explicitly set (undefined or have no value) take the values of PARAMS of the same name. INPUT values defined explicitly (by default or set in Runbook) take precedence over PARAMS of the same name. INPUTS not defined in task definition have different behavior.
Debugging ActionTasks
Potential problems with ActionTasks come in three general categories: (1) errors during execution, (2) task does not run (stays in an open queue), and (3) task runs, but unexpected results occur. There are general troubleshooting guidelines to follow, as well as helpful parameters (the LOG variable) to use in debugging ActionTasks. For more information regarding Runbooks, see Automation Development.
Testing and Troubleshooting Guidelines
ActionTasks should be tested independently from other tasks, if possible. Use direct execution from the editor toolbar (via the "Play" icon) and try all variations of input values. The Mock options are helpful in this regard. As with programming, use logging to trace the code (see below) and add more information to the output (for Content, add to RAW; for the Assessor, add to DETAIL).
Groovy Console
External tools can be used to help with testing and troubleshooting. Groovy Console can be used to test and develop logic, although the release versions of Groovy Console and the Actions Pro Groovy code (dependent on the Actions Pro release) should be considered. Something that runs in the newest Groovy Console may not be supported in the Actions Pro Groovy version. Release notes should be referenced. The documentation at the Groovy support site does a fair job of showing what features are new to a release. If code works in Groovy Console and not in Actions Pro, suspect a release issue.
Coding using "cut-and-paste" editing can also add hidden characters to code and cause Groovy errors. If in doubt, re-type the code rather than inserting code and see if the problem goes away (or moves to the next line).
Debug Mode
Debug information can be built into the Groovy code of a REMOTE-type ActionTask and displayed when the task is executed in the "Debug" mode. DEBUG statements (DEBUG.println) and log output from the task execution are shown in the "Debug" tab of the worksheet. Debug statements only get printed when an ActionTask is running in Debug mode.
Using an identity field in the DEBUG.println makes the string message easier to trace. For example, start the string with "EXAMPLE: …" to make the message stand out:
DEBUG.println("EXAMPLE: Step x of process complete");
Task Not Running
If an ActionTask is not running, then the task status will remain "open" in the request history. In such case check:
- If an RSRemote is running.
- If there is a QUEUE_NAME set to a non-existing queue or a queue with no running RSRemote.
- Has the TARGET been set to a non-existing queue or a queue with no running RSRemote.
- If the task is doing work, but running a long time or waiting for a resource to be freed.
Unexpected Results
If an ActionTask returns unexpected results, then check the task using logging to trace the execution:
- If a Parser is used, check that the Parser and Assessor have matching data types.
- Check the TARGET: in looking for where a task runs, you may need to check multiple RSRemotes if more than one is listening on a QUEUE.
- If the task assumes a Windows target, is it running on a Windows-based RSRemote.
- Consider adding TARGET to the task RAW output.
- Check the log file on the RSRemote that should be running the task.
The LOG variable and Logging Guidelines
The LOG variable is a helpful debugging parameter that is used to output messages to log files. The ActionTask component location of the LOG object determines the log file destination of the message. LOG messages placed in a Preprocessor or Assessor appear in the log for RSControl (where the Preprocessor and Assessor are), while LOG messages put in a REMOTE-type ActionTask INPUTFILE appear in the RSRemote log. Note that the LOG object is only available in Groovy scripts (Preprocessor, Assessor, and REMOTE-type task INPUTFILE). In an HA environment, the LOG message will be displayed in the log file of whichever component ran the script, so searching multiple logs may be required.
The general logging syntax is LOG.("some message"); where the message might be an error, warning, info, or debug:
- LOG.error("Error message");
- LOG.warn("Warning message");
- LOG.info("Information message");
- LOG.debug("Debug message");
With regards to logging messages, avoid using a generic "some message" that can be difficult to distinguish; use a unique signature that is easy to identify. Also, use a consistent format for messages to facilitate finding messages in logs and that indicate the source and severity of the message. A good pattern to follow might be <level>_<task name>_<message id>: message, with "message id" as a unique string assigned to the message.
Configuring Log Files
Logging in Actions Pro uses log4j. The log4j configuration file can be found at <actions-pro-home>/RSRemote/config/log.cfg for an RSRemote. A sample config file might look like this:
# print only messages of the following level or above
log4j.rootLogger=WARN, RSREMOTE
log4j.logger.com.resolve.rsremote=DEBUG
# appenders
log4j.appender.RSREMOTE=org.apache.log4j.RollingFileAppender
# log filename
log4j.appender.RSREMOTE.File=rsremote/log/rsremote.log
# Maximum log file size
log4j.appender.RSREMOTE.MaxFileSize=32MB
# Keep one backup file
log4j.appender.RSREMOTE.MaxBackupIndex=3
# layout pattern
log4j.appender.RSREMOTE.layout=org.apache.log4j.PatternLayout
log4j.appender.RSREMOTE.layout.ConversionPattern=%d %5p [%t] (%F:%L) - %m%n
The level setting for a log file is set by the "log4j.logger.com.resolve.rsremote" command. It gives the lowest level of messages to log, from DEBUG, INFO, WARN, and up to ERROR. The log file prints only messages of the set level and higher, therefore the DEBUG setting logs all messages, while the ERROR setting logs the least. The logging level can be changed dynamically. The default level is WARN: logging at the DEBUG level is quite a lot for robust Runbooks, and might even compromise performance.
The log file location is set by the "log4j.appender.RSREMOTE.File" command. Similar settings exist at <actions-pro-home>/RSControl/config/log.cfg for the RSControl log4j configuration. The log file locations should be isolated away from the root file system to avoid filling it with log files.
Accordion Panel Operations
To view or edit each ActionTask component separately, in its own tab screen:
- Go to Action Definition > All ActionTasks or My ActionTasks.
- From the ActionTask list, select the ActionTask you wish to expand and click the View Details icon before its name to open it in the same tab or open the task in a new tab: Middle-click on the ActionTask name or on View Details button; Right-click on the ActionTask name or on View Details button which expands a drop-down option Open link in new tab as shown in Figure 3;
- Select one of the 11 tabs you wish to view or edit separately and click the Edit icon.
- Click the Maximize section icon on the component screen. The selected component appears on a separate screen.
- To exit the separate screen, click the Resize back to normal icon on the component screen.
Each item can be 'expanded' or 'stretched' to reveal the content associated with that item. You can choose a single or several items to be expanded, depending on the workspace needs.
Refer to the following table for more information on the components available for each ActionTask.
| Tab View | Description |
|---|---|
| General | General (1) - Overview of the ActionTask, including its name, location in the organizational structure, summary/description, and access rights. Roles (2) - Add or remove user roles (access rights) required to execute the task (default: action_execute); roles must already exist to be permitted to execute the ActionTask Options (3) - Add or remove pre-defined options that specify values for common variables |
| References | Contains data for Runbooks that currently use this ActionTask. |
| Parameters | The input and output variables used by the ActionTask. Input (1) Output (2) |
| Preprocessor | (Preprocessor) Instructions, written in Groovy, to potentially modify and prep input values of the ActionTask before execution. |
| Parser | Instructions, written in Groovy, to parse commonly formatted data (such as XML or CSV files) to variables that are more easily accessed by Actions Pro. |
| Assess | (Assessor) Instructions, written in Groovy (or, optionally, Python for EMBEDDED_PYTHON), on how to interpret and evaluate results of the ActionTask. Although the Assessor is not technically required, it is used in most ActionTasks to determine the condition dependency. |
| Assign Values to Outputs | This section provides a convenient method to assign values to output parameters. |
| Severities and Conditions | This section allows you to describe complex rules that will assess and determine ActionTask execution severity and condition. |
| Summary and Details | These two fields in this tab allow you to add detailed information and descriptions to the functions. This may include statements regarding the execution of ActionTask, including outputting key information. |
| Mock Definition | Dummy data set to send as RAW data, in substitution for actual RSRemote execution of the ActionTask Content script, to help test task results and assessment. |
| Tags | Add or remove tags associated with the ActionTask to ease searches |
Toolbar
File Drop-down
Use the File drop-down menu to access the file-related options.
Refer to the table below for more information about the ActionTask File drop-down menu in read-only mode.
| Name | Function |
|---|---|
| Edit | Click to enter Edit mode. |
| Move/Rename | Use it to move or rename the selected ActionTask. Unique Name and Namespace are required. |
| Expand All/Collapse All | Allows you to view/edit all ActionTask tabs on a single screen in expanded view. |
| System Info | Displays the system information about the selected ActionTask |
| Toolbar Settings | Choose one of the following four options: None, Icon Only, Text Only or Text and Icon. |
| View ActionTask List | Reverts to the All ActionTask list. |
The File drop-down menu items change when the ActionTask is in Edit mode.
Refer to the table below for more information about the ActionTask File drop-down menu in edit mode.
| Name | Function |
|---|---|
| Save | Saves the applied changes in any of the ActionTask components and creates a new draft version. For further information on how to use "draft" versions and how version control works, refer to Version Control. The option is inactive if there are no applied changes. |
| Save As | Use it to move or create a copy of the ActionTask. Unique Name and Namespace are required. For detailed steps refer to Save As ActionTask section above. |
| Commit | Saves the applied changes in any of the ActionTask components and creates a new stable version. For further information on how to use "stable" versions and how version control works, refer to Version Control. The option is inactive when the viewed ActionTask version is "stable" as well. |
| View Version List | Displays the list of created versions in a Version List dialog. For further information on how to use "draft" versions and how version control works, refer to Version Control. |
| System Info | Displays the system information about the selected ActionTask |
| Toolbar Settings | Choose one of the following four options: None, Icon Only, Text Only or Text and Icon. |
| Exit Edit Mode | Opens read-only mode. If there are unsaved changes you will be prompted to save or ignore them. |
| View ActionTask List | Reverts to the All ActionTask list. |
System Toolbar read-only mode
The system toolbar is available on each ActionTask Builder screen. It provides several useful functions.
Execute: This button to immediately execute the ActionTask. The resulting "Execute" dialog prompts the New Worksheet, Debug, Mock, and Parameter options. The Execute button is disabled in edit mode in case there are unsaved changes in the ActionTask Builder. You need to save your changes in the ActionTask. Execution is available only for the latest version of the ActionTask. In case an older version is loaded you will be prompted to load the latest and then execute.
Keep in mind that you can only execute the latest version of the ActionTask. If you are using an older version of the ActionTask, you will be prompted to load the latest version.
Edit: Triggers the Edit mode.
Reload: Updates to reflect the currently available form and information. The reload intervals can be adjusted.
System Toolbar in Edit Mode
Execute: Immediately execute the ActionTask. The resulting "Execute" dialog window prompts the New Worksheet, Debug, Mock, and Parameter options. The button is inactive if there unsaved changes.
Save: Saves recent changes and creates a new draft version.
Exit Edit Mode: Opens read-only mode. If there are unsaved changes you will be prompted to save or ignore them.
Reload: Updates to reflect the currently available form and information. The refresh intervals can be adjusted. This will not refresh the Add tag list in the Tags tab, in ActionTask Builder.
General Tab
This tab view provides a general summary of the ActionTask. By default, the Properties screen is presented, which displays metadata such as the module location of the ActionTask.
This is the ActionTask in Edit mode. You can access and modify the information, available on the General tab screen:
General tab > Properties
Definitions of the fields of information, available in the Properties section of the General tab screen when the Edit mode is on:
- Namespace: This is a label for containers. It can be for documentation, Runbooks, ActionTasks, or Wiki documents. There are no restrictions.
- Menu Path:
- Name: Name of the ActionTask.
- Type: REMOTE, ASSESS, OS, BASH, CMD, CSCRIPT, POWERSHELL, PYTHON, EMBEDDED_PYTHON
- Timeout (secs): 300 is the default timeout value but you can change it.
- Assigned To: User (selected with the "Search" icon and viewed with the "View Details" icon ) assigned to maintain the ActionTask, which will display in My ActionTasks menu list for the assigned user.
- Summary: Brief description of the ActionTask displayed in search lists.
- Description:
- Active (checkbox) - Enable or disable the ActionTask from execution; if disabled, also affects any referencing Runbooks to fail to execute (ActionTask Lists display "Active" status as a separate column
- Log raw result (checkbox) - Used to log or discard the RAW ActionTask results once it has been processed.
- Display in worksheet (checkbox) - Always display task results in Worksheet.
Types of ActionTasks
Different ActionTask types have different executable components, whether scripts (in the Content tab) or commands (in "Command") line and uses different Actions Pro task components (Preprocessor, Content/Command, Assessor). If the task requires a command line (OS, BASH, CMD, POWERSHELL, and sometimes PROCESS), then the "Command" and "Args" (Arguments) fields are used to input commands and arguments.
Other task types typically use the "Content" script.
The default task type is REMOTE, which is the standard task that uses Groovy script in the "Content" area. The two other commonly used standard ActionTask types are:
- ASSESS (uses only the Assessor)
- OS (uses only the "Command" field)
- PROCESS-type tasks are built-in internal ActionTasks that developers are unlikely to create or customize
The following ActionTask types are supported by Actions Pro:
| Type | External Process | Description |
|---|---|---|
| ASSESS | False | Skips any RSRemote execution to directly execute the Assessor script on RSControl. Mostly used to assess and format the results from multiple previous tasks, or to run the initial setup on a Runbook (for example, converting PARAMS from multiple possible sources to a consistent set of FLOWS). |
| REMOTE | False | Executes the script from Content on the RSRemote |
| OS | True | Operating System command-line execution of the "Command" and "Args" fields on the RSRemote executing the task. note The shell commands such as |
| BASH | True | Similar to OS-type, except executing UNIX commands inside of bash shell (automatically prefixes the "Command" field with/bin/bash -c). Needed for piped or redirected commands (for example, ps -ef grep resolve). Should only be executed against RSRemotes on UNIX systems. |
| CMD | True | Similar to OS-type, but Windows CMD shell execution of Windows commands (for example, dir C:tmp) and .bat batch files (automatically prefixes "Command" field with cmd /c). Should only be executed against RSRemotes on Windows systems. |
| CSCRIPT | True | Windows CScript/VBScript file execution of "Content" script, runs anything that Windows scripting runs, including Javascript if given specific support (automatically prefixes "Command" field with cscript/nologo). Should only be executed against RSRemotes on Windows systems. |
| POWERSHELL | True | Windows PowerShell execution on "Content" script (automatically prefixes the "Command" field with powershell and suffixes INPUTFILE with .ps1). Only execute it against RSRemotes on Windows systems. |
| PYTHON | True | Executes Python code from your Content scriptas an external process on RSRemote. Cannot be used in the Assessor or in Assess-type ActionTasks. It does not provide a native way to pass and retrieve data to/from the Python script. |
| EMBEDDED_PYTHON | False | Unlike PYTHON, EMBEDDED_PYTHON executes your Python script within the module's JVM. You can use Python to code Content and Assessor. It can use Java objects bound to Assessor and Content scripts like PARAMS, FLOWS, INPUTS, and ESB natively in Assessor and/or Content Python scripts. Embedded Python depends on a standalone Python installation. See Clustered Installation for details. |
REMOTE ActionTasks Comparison
For REMOTE-type ActionTasks, the script to execute is in the "Content" tab (the ${INPUTFILE} variable) is not required.
- The Content script can contain most Groovy language elements and libraries (including Java).
- The script results, passed back as "return" values, are passed as the RAW variable to the Parser and Assessor.
- The "return" values must be either of class String or convertible to String
This is an Actions Pro issue related to message queueing, and not to Groovy; for details on conversion, see ActionTask Content.
The executed content is delivered in a temporary file referenced by the ${INPUTFILE} variable for these types of ActionTasks:
- OS
- BASH
- CMD
- CSCRIPT
Command execution returns values of "STDOUT" and "STDERR" as the RAW. If either STDOUT or STDERR is re-directed, then the value is not returned.
General tab > Roles
The Roles section on the General tab of an ActionTask gives information about which roles have the right to view, edit, execute, or administrate the related ActionTask.
General tab > Options
Options are values that can be set to control the execution of tasks. They are additional entries that help set context, akin to command-line switches. Options are set at task creation time and some may be changed in a process or task.
To view the existing options or set new ones for an ActionTask:
- Go to the Action Definition main menu > select either My ActionTasks or All ActionTasks.
- From the ActionTasks List, click the View Details icon next to the ActionTask you wish to view or modify.
- Click the Edit icon to edit the ActionTask.
- Go to the Options tab and view all existing options of the selected ActionTask.
- To Add an Option:a) Enter the name of the option in the Name field, or select a default option from the drop-down menu.b) Enter Value.
Options are values that can be set to control the execution of tasks. They are additional entries that help set context, similar to command-line switches. Options are set at task creation time and some may be changed in a process or task) Add Description of the optioned) Click the Add Option button.
You can modify the Name, the Value or the Description of an existing option by clicking on the respective field.
To delete an option, click the Remove button next to it. The option disappears from the list immediately.
The following table shows the options available for each ActionTask.
| Option Name | Description |
|---|---|
| CLASSPATH | Java execution classpath |
| EXECPATH | OS execution path location |
| JAVAOPTIONS | Java command-line options |
| BLANKVALUES | Replace matching values with **** |
| TAILLENGTH | Number of lines to retrieve from the end of the file |
| RESULTTYPE | Method for retrieving result value (e.g. STDOUTERR, FILE) |
| RESULTFILE | Filename for resulttype FILE |
| RESULTFILE_REMOVE | Remove resultfile on completion (*default: false) |
| RESULTFILE_WAIT | Wait secs before retrieving RESULTFILE |
| TMPFILE_PREFIX | Prefix string prepended to tmpfile (default: blank) |
| TMPFILE_POSTFIX | Postfix string appended to tmpfile (default: .tmp) |
| TMPFILE_REMOVE | Remove tmpfile on completion (default: true) |
| INPUTFILE | Contents for a temporary input or script file |
| INPUTFILE_POSTFIX | Filename extension to use for the temporary INPUTFILE (default: .in) |
| CMDLINE_EXCLUDE | Exclude the command line from display in the result RAW output |
| QUEUE_NAME | Name of the JMS Queue to send the ActionTask request |
| EXTERNAL_TYPE | Select either SSH or ITM connection for script execution in EXTERNAL-type ActionTask. |
| METRIC_GROUP | Internal Use |
| METRIC_ID | Internal Use |
| METRIC_UNIT | Internal Use |
| TIMEOUT_DESTROY_THREAD | Internal Use |
Java Options
Additional classpath and java command-line options may be required when executing Java. These are specified via the CLASSPATH and JAVAOPTIONS.
Result File
The results are retrieved from task execution via STDOUT and STDERR by default. Some actions may output the result to a file.
- To retrieve the results from a file, the RESULTTYPE must be changed from STDOUTERR to FILE. In addition, the RESULTFILE must contain the location of the output file.
- It is possible to use the special variable ${TMPFILE} to provide a unique filename for the output file in the Command / Filename field and in the RESULTFILE option. The TMPFILE_PREFIX and TMPFILE_POSTFIX allow additional text to be added to the filename.
- The RESULTFILE_WAIT option instructs the REAction to wait for the specified number of seconds after the task is completed before reading the contents of the file, while the RESULTFILE_REMOVE option instructs the REAction to remove the specified RESULTFILE after it has retrieved its contents.
- The TAILLENGTH option instructs the REAction to only retrieve the last N lines from the RESULTFILE instead of the entire file.
Input File
Normally, the files required should be on the system where the task is executed, either by manually copying the files there or through the use of the included File Version Control System. However, for small and frequently modified files, Actions Pro can send the file to REAction when the task is executed.
- The contents of the file are defined in the INPUTFILE option.
- The RSAction automatically assigns a unique filename for the INPUTFILE.
Expect File
The EXPECTFILE option contains the contents of the EXPECT Groovy script file. Unlike INPUTFILE however, no files are actually created as the task is executed directly with the RSAction JVM.
Queue Name
The QUEUE_NAME option lists the name of the JMS Queue to receive the ActionTask request. The default is RSREMOTE. To configure additional queues for RSRemotes, see Queues.
Reference Tab
Runbooks are essentially composed of multiple ActionTasks in defined sequences. The Reference tab allows you to track in which Runbooks this ActionTAsk is used.
The Runbooks listed in References can be viewed only. The referenced tab does not allow detaching the ActionTask from the Runbook. To remove the dependency:
- Click on the Go To button next to the Runbook name which opens the Runbook in a new browser tab.
- Navigate to the model (Main model, Abort Model or Decision Tree model) where the Task is used.
- Enter edit mode of Automation Designer from Edit button Remove the ActionTask by pressing Delete key or by selecting Delete option as shown in Figure 7 - Right-click on automation element in Runbook Automation Designer guidelines .
- You have to remove the ActionTask from any place where it is referenced.
- Save changes in the Automation Designer through File drop-down menu, through the Save button or using a short cut key Ctrl+S.
- Go back to the ActionTask in ActionTask Builder and click Reload button .
Parameters Tab
An ActionTask can define a list of parameters that are resolved at execution. The use of variables to pass information into and out of ActionTasks is known as data handling. This allows for input from users and permits the creation of "re-useable" tasks that are customizable through inputting different data values. One ActionTask can be used in several different processes, with data values passed at the time of execution in the process. Input and output variables to handle such data can be assigned (with optional default values set) in the ActionTask Parameters tab.
Create Input
To add a new input parameter to an ActionTask, select the Edit icon, and click on the Inputs tab.
When writing a task, consider the source of the information used by the task, and where or when data values might be set. Information can be constant, stored in variables, properties, or come from user input. The form a variable takes depends on where it is used.
The input parameters appear on the list.
The following Table shows more information on the Inputs section of the Parameters tab and their definitions.
| Field | Description |
|---|---|
| Create Group > Group Name | Input a group name and select Add Group to have it prepopulated in the second field next to the Name field. |
| Create Input | |
| Name | Enter the name assigned to the input/output. Allowed parameter's name characters are- alphanumerics and underscores. ActionTask parameter name must start with a letter. |
| Description | This field allows you to add detailed information and descriptions to the functions. |
| Default | Enter the default input value. |
| Encrypt | If the input is a password (can be any input value), the encrypt option becomes available. |
| Required | |
| Protected | Protected means that INPUT/OUTPUT parameter defined in the ActionTask Builder cannot be user-modified in Action Task Builder's Execute dialog nor in Automation Designer. By default, there is no group defined, or unclassified. After a group is created, this group is added to the selection. |
Create Output
Same as with Create Input, the Create Output tab contains options to either view and modify an existing Output parameter or to create a new one.
Inputs and Outputs in ActionTasks
INPUTS, OUTPUTS, FLOWS, and PARAMS are all different types of parameters available to ActionTasks, each with a specific purpose.
- By convention, parameter names are written in all uppercase. Allowed parameter's name characters are- alphanumerics and underscores. Parameter name must start with a letter.
- FLOWS are variables that can be used in Preprocessors and Assessors of ActionTasks. They are path-specific global variables within Runbooks and described in more detail in Runbook Variable Types.
- INPUTS are locally-defined ActionTask variables that can be used in the Preprocessor, Assessor, and task execution, and allow values to be passed into an ActionTask. An ActionTask uses the default values for INPUT variables set in the Parameters screen. The default values can be overwritten and pre-defined in the automation model of the including Runbook, or modified by a user interacting through a wiki form during Runbook execution. INPUT values can also explicitly reference values from other sources, usually the OUTPUT values from the previous ActionTask in the Runbook sequence.
- OUTPUTS are local output variables that can be used to pass values from the assessment of one task to the INPUTS of the immediately subsequent task. OUTPUTS are set in an Assessor and accessed through either the Preprocessor or INPUT parameter definition.
All INPUT and OUTPUT parameters can be defined as part of the ActionTask definition, with names and optional default values set in the Parameters screen. Values can also be set at execution time (values start as null if no defaults are set). The INPUTS and OUTPUTS variables for an ActionTask are displayed when hovering the cursor over the task in the automation model. See Runbook Development; Creating and Automation Model/Model Builder Interface).
Accessing Inputs and Outputs
INPUTS and OUTPUTS, as well as FLOWS and PARAMS, are accessible in two different ways:
Parameter Maps: as Groovy map objects inside of Groovy scripts and processes (Assessor, Preprocessor, and REMOTE-type tasks). At the start of each ActionTask execution, the INPUTS object is initialized to an empty hash map and then populated from the list of parameters defined for the tasks. The OUTPUTS object is likewise initialized before assessment for the Assessor to set. The map objects are accessible during runtime through the plural form of the parameter (INPUTS, OUTPUTS, FLOWS, PARAMS) and can be read from and set to like a regular Groovy map:
READ: def variable = FLOWS["NAME"];
WRITE: INPUTS["NAME"] = value;
Parameter Substitution: through direct substitution or replacement in command lines (such as in OS-type tasks) before task execution. The variable form takes the dollar sign followed by the singular parameter name in curly braces: $INPUT{NAME}, $OUTPUT{NAME}, $FLOW{NAME}, $PARAM{NAME}. The server finds the named variables and replaces the values (so they are not really variables anymore, and errors might occur if values are manually set). Accessing parameters in this way is necessary when the map method is unavailable (again, such as in OS-type tasks). This method is read-only. When a command-line task prompts a user for input, the parameter place-holders defined in the "Command" and "Args" fields are substituted with these input values. This substitution method can also be used to pass parameters into INPUTS before run time by setting the default value, for example, to $FLOW{NAME} or $OUTPUT{NAME}. Variables can be accessed through direct replacement as follows:
READ: $INPUT{NAME}
WRITE: n/a
For example, if the INPUT parameter IPADDRESS has been set to 127.0.0.1, then ping $INPUT{IPADDRESS} will be executed as ping 127.0.0.1.
The following table explains how to use the dialog box fields.
Preprocessor Tab
This feature allows input of preprocessor instructions for ActionTask. The preprocessor is code executed on the RSControl server, rather than on the target RSRemote. Use Groovy to write preprocessor code. You can also access external Java libraries in your Groovy code.
Preprocessors are used for two different purposes. The first purpose for Preprocessors is data marshaling: organizing and editing variables before running the ActionTask.
For example, if a Runbook;
- is initiated from a Netcool event
- one of the parameters required by the ActionTask can be taken from several different fields
- the Preprocessor then can be used to determine which field is correct and put that field into an INPUT parameter before running the ActionTask.
The second purpose, and more often used, is to set targets. TARGETS is a special class that can be used for two purposes:
- Set a specific RSRemote target to run the ActionTask.
- Set multiple TARGETS to run the task multiple times concurrently.
Data Marshalling
Passing the OUTPUTS variable of the previous ActionTask in a workflow into the INPUTS of the current ActionTask is the most common form of data marshalling.
- The INPUTS variable is created in an ActionTask at the beginning of the Preprocessor and not destroyed until after the Assessor.
- OUTPUTS are created after the Assessor and destroyed at the Preprocessor of the next ActionTask; the overlap makes an OUTPUT value available to be set into an INPUT for the next ActionTask.
The following code can be used to access and place the OUTPUTS variable:
INPUTS[<span style="color: #5d90cd">"<PARAMETER>"</span>] <span style="color: #484848">=</span> OUTPUTS[<span style="color: #5d90cd">"<PARAMETER>"</span>];
See Inputs and Outputs in ActionTasks and Automation Data Handling for more about using INPUTS and OUTPUTS in ActionTasks and Runbooks. See Parameter Bindings for setting specific values to INPUTS and OUTPUTS variables for ActionTasks within an automation model.
Initializing Property Values as INPUTS
The following code can be modified to pull property values from the database to use them as parameters. This would be useful if the ActionTask is of type CMD or WINEXEC and you would like to use a property value as one of the parameters for the command.
import com.resolve.sql.SQLRecord
import com.resolve.util.CryptUtils

def rec = new SQL Record(DB, "resolve_properties")
rec.query("u_name", "<PROPERTY>")
if (rec.next())
  {
    def username = rec.getString("u_value")
    [//PARAMS.put](https://resolvesys.atlassian.net//PARAMS.put)("<PARAMETER>", username)
    INPUTS["<PARAMETER>"] = username
  }
Adding a Target
The following code clears any existing targets and adds multiple targets that are used to execute the ActionTask multiple times, concurrently.
- The TARGETS.add method takes up to three arguments (a "NAME", a "QUEUE", and a parameter map), and can be called more than once in a Preprocessor.
- The task executes once per unique target "NAME" (the unique string used only to keep track of execution results).
- Groovy code can be used in the Preprocessor to calculate how many targets (task executions) to set and their parameters based on the INPUTS.
TARGETS.clear() // refresh variable
TARGETS.add("255.255.255.255") // specify target name
TARGETS.add("255.255.255.255", [:]) // specify target, passed parameters
TARGETS.add("255.255.255.255", "RSREMOTE", [:]) // specify target, queue, and passed parameters
The "QUEUE" parameter is a named queue on which the task (and all subsequent tasks until a "Merge Targets" dependency) should execute. This allows the queue to be dynamically determined by the Preprocessor, instead of being hard-coded in the task definition. If no queue name is passed, the tasks will execute on the default RSREMOTE queue.
Finally, the parameter map is added to PARAMS during execution. This allows different parameters to be passed to each execution. Note that this is after INPUTS are set, so an INPUT value referencing PARAMS will not read from these additional PARAMS.
Example: Targets in Preprocessor
The following sample task takes a comma-separated list of IP addresses as input. The Preprocessor code creates one target for each IP, using the IP as the name, and giving one parameter called "IP" which contains the address:
TARGETS.clear()
Addresses = INPUTS["ADDRESSES"]
Addresses.split(",").each{I ->
  TARGETS.add(i, ["IP":i])
}
The Command Line gets IP from PARAMs instead of INPUTS so that each target execution will only ping the IP passed in by the Preprocessor:
ping $PARAM{IP}
PARAMS Value Precedence
PARAMS is one of the special variables that provides a context for passing parameters between ActionTasks. PARAMS is a string hash map that can be used to store values flowing through a Runbook, from task to task. Each task may add, update, and remove variables within the PARAMS context along the way as required by the Runbook.
PARAMS is unique to an automation pathway or flow. Two different concurrent flows may have different values stored in the PARAMS context. PARAMS is copied for each executed ActionTask, and can subsequently be independently modified by each succeeding ActionTask Preprocessor and Assessor.
Unlike the special variable FLOWS, which must be explicitly inserted or removed by Preprocessors or Assessors, the variables in the PARAMS context are automatically initialized by Actions Pro. Values are inserted into PARAMS for each input parameter defined for the ActionTask. The value that is inserted for the input parameter (identified by its name) is determined by the following value precedence:
| Types | Defined At | Descriptions | Comments |
|---|---|---|---|
| PARAMS Variables | Auto-Populated or inserted by Assessors / Preprocessors | Existing variables' in PARAMS | If a PARAMS variable already exists, the existing value is used and not modified. |
| User Input | Updated by the user before the request is submitted | User manually input or update the value | The execute request parameter values are modified by the user before the request is submitted. |
| Predefined Values | Runbook Task Properties or Wiki Tags | Predefined parameter values in the Runbook or Wiki | The ActionTask properties in the Runbook automation model or the wiki action tags contain predefined values for parameters. |
| Default Value | ActionTask Parameter definition | Default ActionTask parameter value | The default ActionTask parameter value. |
Content Tab
The ActionTask Content section provides executable content for the task to perform, usually Groovy script code for REMOTE-type ActionTasks to execute on RSRemote. The Groovy script includes the instructions and commands for performing all of the REMOTE steps, including using Adaptors to execute actions on external systems.
RSControl sends INPUTS, FLOWS, and the Content script to a waiting RSRemote (which can be specified via targets or the QUEUE_NAME option). The "return" value of the Groovy script is passed into the RAW variable for the Parser and Assessor. For an overview of how Content scripts are executed, see the process execution flow in ActionTask Components and Process Flow.
Note that the "Syntax" field is a drop-down menu listing different scripting languages. This option does not convert or compile content into the selected scripting language; the "Syntax" field changes only the text highlighting to match the selected option.
For OS, CMD, BASH, or CSCRIPT-type ActionTasks, content is delivered in a temporary file referenced by the ${INPUTFILE} variable (although for ASSESS and PROCESS-types, this file is ignored). These tasks return values of "STDOUT" and "STDERR" as the RAW variable. If either STDOUT or STDERR is redirected, then the value will not be returned. The ${INPUTFILE} file name extension will be ".in", but if it is to be used on Windows, change may be needed to allow execution. Some examples of use in Unix are:
mailx –s subject to@address < ${INPUTFILE}
perl ${INPUTFILE}
For CSCRIPT, the file is executed as a script:
cscript ${INPUTFILE}
Groovy Scripts in ActionТask Content
An ActionTask executes script code from its Content component. In a REMOTE-type task, Groovy code is placed in the Content section and this is executed by the RSRemote (in an OS-type task, the shell command from the Command Line section is sent and executed by the RSRemote). Although other scripting languages can be used, Actions Pro runs Groovy natively. The Content can contain most Groovy language elements and libraries (including Java). The Content script code is sent to the RSRemote as a temp file, which is then run through the Groovy interpreter.
You can also access external Java libraries in your Groovy code.
The name of the temp file can be accessed via ${INPUTFILE}. For example, in a Groovy script, this:
def inputFileName = "${INPUTFILE}"
Becomes similar to this:
def inputFileName = "infile_pool_3_thread_3.in"
The results of the Groovy script, passed back via "return" values, are passed as a RAW variable to the Parser and Assessor (see the process execution flow in ActionTask Components and Process Flow). The "return" values, however, must be either of class String or convertible to String. This is an Actions Pro issue (related to interaction with message queueing), and not Groovy. A library exists, extending the StringUtils class that converts objects to Strings. The Actions Pro implementation of StringUtils extends the Apache. The method to use is:
public static String obj ToString(Object obj)
To convert an object to String(ByteArray):
String s = StringUtils.objToString(Object your Object)
Then, when you need to restore it, use string To Obj(String):
Object your Object = StringUtils.stringToObj(String s)
Other Groovy Script Guidelines
Keep in mind the different ActionTask Components and their respective functions and locations (Actions Pro components). Keep the Content scripting simple and clear and avoid using "business logic". Save the business logic or assessment for the Assessor.
Use try/catch blocks to handle exceptions. The default handling returns an error (output) in the RAW variable to the next ActionTask component.
To insert a delay in a task, use Thread.sleep() and avoid the Groovy sleep() command.
Avoid regular expressions and use simple string manipulation, such as indexOf(), toString(), and substring().
Embedded Python Scripts in ActionТask Content
Embedded Python ActionTask type requires additional setup. See Clustered Installation for details.
The Embedded Python ActionTask type executes your Python script within the module's JVM. Custom Java Native Interface (JNI) libraries are distributed and loaded within the RSControl and RSRemote JVM. This compares to the Python ActionsTask type that executes as an external process. This method of running Python has the benefit of having access to more parameter bindings.
When creating an ActionTask, configure it as follows to create an Embedded Python task.
Type
EMBEDDED_PYTHON
Content
The script type is preselected according to the EMBEDDED_PYTHON ActionTask type.
Assessor
Use either Groovy or EMBEDDED_PYTHON to write your assessor script.
Parameter Bindings
Bindings available in Content and Assessor:
| Binding | Java Type | Usage in Python Script |
|---|---|---|
| PARAMS | java.util.Map | PARAMS["param_name"] |
| FLOWS | java.util.Map | FLOWS["param_name"] |
| INPUTS | java.util.Map | INPUTS["param_name"] |
| ESB | com.resolve.esb.ESB | params = {"WIKI": "qa_training.comment", "PROBLEMID": "NEW", "USERID": "admin", "PROCESSID": "NEW"}ESB.sendMessage("RSCONTROL", "MAction.executeProcess", params) |
| OLD_PARAMS | java.util.Map | OLD_PARAMS["param_name"] |
| ARGS RAW SYSLOG REFERENCE PROCESSID PROBLEMID WIKI DEBUG ACTIONNAME USERID | java.lang.String | ARGS = ""_RAW_RESULT_="" / RESULT.setSummary(str(RAW))x = str(SYSLOG)x = str(PROCESSID)x = str(PROBLEMID)x = str(WIKI)x = str(DEBUG) |
Bindings available only in Assessor:
| Binding | Java Type | Usage in Python Script |
|---|---|---|
| OUTPUTS | java.util.Map | OUPUTS["param_name"] |
| PROPERTIES | com.resolve.rscontrol.ActionTaskProperties | PROPERTIES.get("prop_name") |
| RESULT | com.resolve.assess.AssessResult | RESULT.setSummary("")RESULT.setDetail("") |
| WSDATA | com.resolve.services.util.WSDataMapImpl | WSDATA.set("key","value")WSDATA.get("key") |
Bindings available only in Content:
| Binding | Java type | Usage in Python Script |
|---|---|---|
| SESSIONS | com.resolve.rsbase.SessionMap | Not available when using Python. Use Groovy to access this binding. |
Assessor Script Examples - Embedded Python
The following assessor code sets propeties of the ActionTask's RESULT object.
RESULT.setSummary("UploadLogs");
RESULT.setDetail("This ActionTask uploads the current log file to a designated storage");
RESULT.setSeverity("warn");
RESULT.setCondition("bad");
The following assessor code sets the Summary propety of the ActionTask's RESULT object to the stringified value of the raw data from Content (a date value in this case).
from datetime import date

now = datetime.now();
date_time = now.strftime("%m/%d/%Y, %H:%M:%S")
_RAW_RESULT_ = date_time;
from datetime import date

RESULT.setSummary(str(RAW));
Other Scripts in ActionТask Content
ActionTasks are split into a series of components that reflect individual "execution steps". The use of the components depends on the type of task. An ActionTask executes script code, by the RSRemote, from its Content component.
In a REMOTE-type task, Groovy code is placed in the Content section (while in an OS-type task, the shell command from the Command Line section is sent to and executed by the RSRemote). The Content script code is sent to the RSRemote as a temporary file, which is then run through the Groovy interpreter. The name of the temp file can be accessed via ${INPUTFILE}.
Likewise, with an OS-type ActionTask, anything in the Content section still gets sent over to the RSRemote as a temporary file, which can be referenced using ${INPUTFILE}. Thus, scripts can be executed in languages other than Groovy script, with OS-type ActionTasks using the INPUTFILE.
Executing Perl Scripts
Perl scripts can be executed on the RSRemote using the Command Line and INPUTFILE. To achieve this, create a new ActionTask and place the Perl script into the Content section of the task. This method can be used to execute other types of scripts, provided that the RSRemote machine is able to execute the desired script from the command-line. To choose the required RSRemote to run a specific script, use targets or the QUEUE_NAME options.
The following script is used in this example:
# you can program answer to be heads or tails
$answer = "heads";

if ( $answer ne "heads" and $answer ne "tails" ) {
  die "Answer has a bad value: $answer!";
}

print "Answer is programmed to be $answer.\n";

if ( $answer eq "heads" ) {
  print "HEADS! You WON!\n";
} else {
  print "TAILS?! You lost. Try your coding again!\n";
}
On the Command tab, set the task Type to "OS". An OS-type task will send the Content to the RSRemote as a temporary file, but RSRemote will not try to interpret it as Groovy code (as it would with a REMOTE-type task). An OS-type task will execute the given command-line. For a Perl script, enter the following command (use the proper corresponding command for other script types):
perl –w ${INPUTFILE}
Because ${INPUTFILE} gets replaced with the temporary file name before the command is executed, the command line tells the RSRemote to execute the Perl script written in the Content. When the task is executed, the Perl script gets executed on the RSRemote and passed into the Assessor via the RAW variable. In this example, because there is no Assessor defined, the results on the worksheet will be:
The answer is programmed to be heads.
HEADS! You WON!
Using INPUTS in Perl Scripts
Before the Content is sent to the RSRemote as a temporary file, Actions Pro parses it and does a direct string replacement of any INPUTS specified using $INPUT{}. This allows Perl scripts to use data that has been passed into the ActionTask. To demonstrate this using the task from the previous example, add an INPUT variable in the Parameters tab named "ANSWER". Give it a default value of "tails".
Modify the script in the Content so that the "$answer" variable gets its value from the INPUT. Because the value will be inserted as a direct string replacement, be sure to surround the variable call with quotation marks in the script. Here is the modified line:
# You can program answer to be heads or tails
$answer = "$INPUT{ANSWER}";
The value replacement occurs only if the input is a string. Take this into consideration while debugging and ensure that other types (including gStrings) are converted to strings before being assigned as inputs. Execute the task, and the results will depend on what value the input is set.
Dynamic Perl Scripts Generated by ActionTasks
Using inputs, the task can be used to execute a script generated by previous tasks in automation. An entire script can be passed as an input to the task (ensure that the input is a string), and placed into the Content as previously shown. In this case, if the input name were MYSCRIPT, the content would only contain this line:
$INPUT{MYSCRIPT}
The replacement would happen before the temporary file is sent to the RSRemote, and the input script will be executed.
Parser Tab
The output from task executions contain important information that can be used to determine the state of the systems and guide the next automation step. Because the output data is usually in a standardized format, the Automation Designer can:
- Apply regular expressions (regex) to parse the output
- Extract information needed
- Assign values to variables for processing
Constructing proper regex can be a complex process. To assist users, the "task parser" in the Parser builder will automatically:
- Generate code for regex to identify
- Capture variables and their values from raw task output
The configured parser:
- Extracts data from the RAW variable (returned from RSRemote execution)
- Formats the data
- Outputs to the Assessor for evaluation.
Refer to the table below to see the definitions of the fields of the Parser.
| Field | Description |
|---|---|
| Output Format | Type of output format (Text, Table or XML). |
| Clear Sample | Clear current reference sample output. |
| Clear Markup | Clear all current markups on sample output |
| Show Code | When you click the Show Code button, the Show Markups button appears in its place. Clicking Show Markups reverts the default screen. |
| Run Test | Test current markups with test sample. |
| Parser Control | This field contains all available patterns: Remove Markup - Select any portion of the code in the box above and click remove to delete it. Capture - Select any portion of the code in the box above and click and it will display in the chart below. |
| Parsing Boundary | This section allows you to set or update the parsing boundaries by defining the From to To values. |
Text Parser
To use the Text Parser follows these steps:
- Click the More Information icon next to the ActionTask you wish to modify to view the result details.
- Copy the detailed output and paste into the Reference Output field.
- Highlight the text to be marked. After the text is highlighted, the pattern table shows all available patterns for that selection.
- Select the pattern to apply for that selection.
- To capture this markup, select it and use the Capture button. A new entry for this capture will show up in the variable table.note
You can double click on any field of this entry to modify its value.
- Click Execute Test to test the capture. By default, it will test it against the same sample output we pasted in the "Reference Output."note
Additional test sample can be added using the plus symbol.
Define Output Boundary
To define a boundary of the output:
- Аccess the boundary tab.
- Define both the boundary start and endpoints.
- Click the update to redefine the boundary for the output (within the orange bar).
Repeated Block Option
This option is used if the parsing process is repeated (by default, the parser runs only once). The desired input strings are expected to appear in multiple blocks of data.
For example, we want to capture all IP address in our output. There are two steps:
- Check the repeated block.
- Select the
Execute Test button again.
The result which is assigned to the MyIP variable now contains all the IP addresses. Note that only 2 IPs are captured, the other IP is not captured because it is out of our boundaries.
You have two additional options:
- To view the auto-generated code for that capture; toggle the Code tab.
- To modify the auto-generated code; deselect the Auto-generated checkbox.
Refer to the table below for a quick reference of "Regular Expressions" (regex):
| Sample Regex | Pattern |
|---|---|
| [abc] | A single character: a, b, or c |
| [^abc] | Any single character except: a, b, or c |
| [a-z] | Any single character in the range a-z |
| [a-zA-Z] | Any single character in the range a-z or A-Z |
| ^ | Start of line |
| $ | End of line |
| \A | Start of string |
| \z | End of string |
| . | Any single character |
| \s | Any whitespace character |
| \S | Any non-whitespace character |
| \d | Any digit |
| \D | Any non-digit |
| \w | Any word character (letter, number, underscore) |
| \W | Any non-word character |
| \b | Any word boundary |
| (...) | Capture everything enclosed |
| (a|b) | a or b |
| a? | Zero or one of a |
| a* | Zero or more of a |
| a+ | One or more of a |
| a{3} | Exactly 3 of a |
| a{3,} | 3 or more of a |
| a{3,6} | Between 3 and 6 of a |
Table Parser
You can use Table Parser to parse the output that has a table-like structure.
- Each line can be divided into an equal number of columns separated by a common delimiter.
- The table-like text only supports the extraction of information by column number.
Follows these steps to use Table Parser:
- Paste the sample output into the reference output.
- It is recommended that you start by defining the boundaries. The sample output for this example was obtained from the "tasklist" command below. Define the boundaries to exclude table header names as well as separator lines.
- To turn the output sample into a table-like structure:
a. Highlight the output.
b. After it is highlighted, the Apply On Selection command is enabled. Select it to allow parsing the output into a table-like structure.note
Select the correct separator for your sample "b" using the drop-down menu of Column Separator and Row Separator depending on how each columns and rows are separated.
- Select the column to be captured by using the Select Column dropdown menu and then click the Capture button.
- Similar to the Text Parser, you can then test this capture by clicking the Run Test button.
XML Parser
You can use the XML Parser when you need to quickly generate XPath to capture value in an output that has XML structure.
Follows these steps to use the XML Parser:
Paste the output sample into the Reference Output window.
After it is pasted, the output XML node becomes active and you can start interacting with it. Select a node or a value within a node and it will generate an XPath for it in the XPath Editor. a. Each node, attribute and value within this Xpath can be modified by selecting that node. b. An overlay window allows you to let you edit that particular node. See below.
Field Description Node Name Displays the current selection name. Predicates New Text Allows new text selection to be added to the node. New Attribute Add a new attribute to the node. Custom Allows a new custom input for the Xpath to be added. Condition There are two conditional selections: AND, OR. Attribute There are two pulldown selections and one data entry field. Update Implements the changes to the node. Remove Node Deletes the node. Cancel Stops any action and returns to the previous screen. After confirming the Xpath, select the Capture button to copy the path.
Similar to the Text and Table parsers, you can test the capture in two ways:
- Clicking the Run Test button
- Toggle to Show Code tab to modify the auto-generated code
Assess Tab
The ActionTask Assess tab defines an assessor for the ActionTask, which makes evaluations and determines task success or failure based on results of the command or ActionTask INPUTFILE. An Assessor is a script used to interpret the RAW results from Content (or parsed DATA results from the Parser) to evaluate and determine the ActionTask result status.
You can write assessor code in:
- Groovy for all ActionTask types
- Groovy or Python for EMBEDDED_PYTHON
You can access external Java libraries when using Groovy.
The Assessor not only determines the RESULT values to display in the Worksheet, but also sets OUTPUT values for the following ActionTask in a process to use. For an overview of the process execution flow, see ActionTask Components and Process Flow.
The Assessor performs the following functions:
- Include task-specific logic to interpret the result
- Set the RESULT status variable
- Set WSDATA state variables (optional)
If the Only Completed box in the Assessor definition screen is checked, then the Assessor runs only if the ActionTask execution in RSRemote was completed. For OS-type tasks, an exception stops the Assessor from running. For other ActionTask types, timeouts also stop the Assessor.
Bound Variables in Assessor
The following table lists the intrinsic variables and their types available to the Assessor. A full list of variables bound to the Assessor (and other components) can be found in Reserved Variables table below.
| Variable | Description | Type |
|---|---|---|
| ACTIONNAME | Name of the ActionTask | String |
| RAW | Raw result text | String |
| DATA | Parsed data structure | Type dependent on Parser |
| LOG | Object for outputting to log file, for example, LOG.error() | Object |
| DB | Connection object for database interaction | Connection |
| TARGET | Target RSRemote that carried out the task | Object |
| WORKSHEET | Map Object to change values in the current task's worksheet | Map |
Example Processing - ActionTask Ping
if (RAW =~ /unreachable/ || RAW =~ /timed out/)
{
 RESULT.condition = "bad";
 RESULT.severity = "critical";
}
Assignments Tab
This section provides a convenient method to assign value to output parameters.
- Once the user selects the output type, the available variable name will auto-populate in the drop-down next to the Output Name.
- The user can then selects the Source Type and Source Variable name and form a complete assignment.
Output parameters can be from the following four types:
- OUTPUT
- PARAM
- FLOW
- WSDATA
The table below shows how to edit assign values to output.
| Field | Description |
|---|---|
| Output Type | Type of outputs are FLOW, PARAM, and WSDATA. |
| Output Name | Any name, no restrictions (required). |
| Source Type | Type of outputs are FLOW, PARAM, CONSTANT, and WSDATA (required). |
| Source Name | Depends on what type of source (required). |
| Add Assignments | Add the data entries to the output values. |
| Close | Delimits the selection. |
The OUTPUTS object can then be used to pass values from the assessment of one task to the INPUTS of the immediately subsequent task. Values are retrieved in the Preprocessor of the next task, or referenced by the INPUT variables. For example, if a task populates the OUTPUTS object with a parameter called "IPADDRESS" as follows:
OUTPUTS["IPADDRESS"] = "127.0.0.1"
The INPUT parameter for the next ActionTask can be defined with a value of "$OUTPUTS{IPADDRESS}", typically in the Runbook Automation model or user interaction with a wiki document page. Both INPUTS and OUTPUTS variables for an ActionTask are displayed when hovering the cursor over the task in the automation model. For more information about OUTPUT variables, see Inputs and Outputs in ActionTasks.
Severities and Conditions Tab
This section allows you to describe complex rules that will assess and determine ActionTask execution severity and condition. The values are:
- Conditions:
BAD - This flag indicates a failure condition.
GOOD - This flag indicates a passing condition. - Severity: CRITICAL/SEVERE/WARNING/GOOD/UNKNOWN
Severity generally refers to the condition of the device or service that the ActionTask is concerned with. There are several levels of severity indicated by colour:
These are the indicator colours based on severity:
- CRITICAL: Red. Highest level of failed execution. First to be evaluated.
- SEVERE: Orange. 2nd Highest level of failed execution. Second to be evaluated.
- WARNING: Khaki. 3rd Highest level of failed execution. Third to be evaluated.
- GOOD: Pale Green. This severity level indicates everything is running well and there are no concerns.
For example:
- GOOD – this severity level indicates everything is running well and there are no concerns.
- CONDITION – this is used primarily to control the branching logic in automation. The condition can be either "Good" or "Bad", which can be used to control the execution path after this ActionTask.
User can use "AND" or "OR" rules to group rules together. When using;
- AND - rules are laid out vertically.
- OR - rules are laid out horizontally.
- OR - rules are executed before AND rules.
Editing Severities
To edit a Severity:
Go to Severities & Conditions tab > Severities and click the plus button of the severity you wish to edit.
Add a Determiner, as in the following table and click Add.
The Determiner appears in the Warning section.The following table lists the Severities and Conditions inputs.
Input Description Determiner Only applicable if the variable is a collection. Default to ANY, meaning if any value matches the criteria, the evaluation will return true. ALL means when all the values match the criteria, only then the evaluation will return true. Type Select a quantity on which an operation is to operate. Operand Enter a Variable. Operator Operators supported include =, !=, >, >=, <, <=, contains, not contains, starts with, ends with. It is the user's responsibility to ensure that proper operator is used. Type There are six choices to select in the pull-down; Constant, Input, Flow, Param, WSData, and Property. Operand Select a quantity on which an operation is to operate. Click on the Parameter field To change a Severity parameter.
The window changeс to the input popup screen.
Make the necessary changes in any of the fields and click Done.
The parameter is instantly updated.
Summary and Details Tab
This functionality allows you to add detailed information and descriptions to the functions. This may include statements regarding the execution of ActionTask, including outputting key information.
Accessing Summary & Details
- From the ActionTask list, select the ActionTask you wish to view or modify and click the View Details icon next to it.
- In ActionTask Builder edit mode, click the Summary & Details tab to open the functionality on a separate screen.
Summary
To define a Summary Display Rule:
- Select from the Severity drop-down: ANY, CRITICAL, SEVERE, WARNING, GOOD.
- Select from the Condition drop-down: ANY, BAD, GOOD
- Select a Type of variables from the drop-down: OUTPUT, INPUT, PARAM
- Enter name and click Insert Variable which prepopulates the Text to Display and Preview fields
- Click the Add Rule button.
The new summary appears in the list.
Details
To define a Detail Display Rule:
- Select from the Severity drop-down: ANY, CRITICAL, SEVERE, WARNING, GOOD.
- Select from the Condition drop-down: ANY, BAD, GOOD
- Select a Type of variables from the drop-down: OUTPUT, INPUT, PARAM
- Enter name and click Insert Variable which prepopulates the Text to Display and Preview fields
- Click the Add Rule button. The new Details Display Rule appears in the list.
Mock Tab
This screen facilitates testing of an ActionTask, in particular the Assessor. Mock execution is generally used to evaluate errors or variations in "good" conditions in ActionTasks (and Runbooks) without the problems associated with execution requirements.
- Mock data is substituted as RAW data to send to the Parser and Assessor.
- The actual RSRemote execution of task Content is therefore skipped.
Accessing Mock Definition
- From the ActionTask list, select the ActionTask you wish to view or modify and click the View Details icon next to it.
- In ActionTask Builder edit mode, from the All tab, click the Mock Definition component or click Mock from the tabs in the header to open the functionality on a separate screen.
The Mock Definition screen consists of two functional areas:
- List of mock data sets available for testing.
- Add Mock panel
Adding a New Mock
Enter Name and Description and click Add MockThe newly added Mock Definition appears in the list.
You can modify the Mock Definition by clicking the Edit details icon next to it.
On the new screen displaying the selected Mock Definition, click on any of the fields you wish to change: Type, Name or Value.
The changes become effective immediately. Use the Back button to go back to the main Mock Definition screen.
You can delete a Mock Definition by clicking the Remove icon. The item is deleted immediately.
Adding Parameters to a Mock Definition
- From the Mock Definition screen, click the Edit details icon next to the item you wish to modify.
- The selected Mock Definition displays on a separate screen.
- In the Add Parameter section, select Type, Name and enter Value. Allowed mock parameter's name characters are- alphanumerics and underscores. Mock parameter name must start with a letter.
- Click the Add Parameter button.
Mock Execution
Once a mock data set is created and completed, you can access it for a mock execution. To do it:
- Click the Play button in the upper right corner of the ActionTask Builder tool.
- In the Execute window, check the Mock option.
- From the drop-down menu, choose the name of the appropriate mock data set to run.
- Click the Execute button.
You can add, remove, or modify the task Params defined in the Parameters screen.
Tags Tab
Tags are keyword labels attached to wiki document pages and ActionTasks to organize them within logical groups. An example group is a technology or by-product. Tagging ActionTasks makes them easier to find when searching or filtering by keyword, and simplifies import and export functions.
- Tags are useful when exporting from Actions Pro because the export module can include all wikis with a specified tag. note
Actions Pro 7.0 and prior releases do not support the export of Tags assigned to ActionTasks.
- Unlike wiki documents pages, which are meant to be displayed, tagged ActionTasks cannot be linked to catalogs.
- Tags are not hierarchical;.For example, the "database" tag cannot have the related tags "database.oracle" or "database.mysql".
- Tag names must be in alphanumeric characters only (underscores '_' are allowed, but they cannot be the only characters in the name).
- A tag must be created before it can be used to label an ActionTask.
Creating and Deleting Tag Definitions
There are two methods to create new tags: either define a tag using the main menu or using the "Tag" panel while editing any ActionTask.
New Tag Method #1
To create a new tag from the main menu sets:
- Access Tag Definition from either the Action Definition or Wiki Administration menus.
The Tags list contains all tags already in the system that are created. - Select New to create a new tag:
The newly created tag appears immediately on the list.
Delete
To delete a tag, highlight in the list and click the Delete button:
Deleting a tag definition automatically and permanently removes that tag from any documents or ActionTasks to which the tag has been assigned.
Tag Editing
To edit an existing tag:
- From the Tags list, click the Edit icon in front of the tag Name.
- In the dialog box, you can change both Name and Description of the tag.
Name: Name of the tag, such as "network", to associate with documents or tasks.
Description: A brief description of the tag identifier, does not impact function. It serves as a reference to avoid confusion between similarly-named tags. - Make the necessary changes and click Save. The changes are effective immediately.
- Click the System Information icon to display additional system information in the list:
- Created On
- Created By
- Updated On
- Updated By
- System ID
Assigning Tags to ActionTasks
You can assign an existing tag to an ActionTask by following these steps:
- Go to Action Definition >All ActionTasks or My ActionTasks
- From the All, ActionTasks screen click the View Details icon next to the ActionTask you wish to assign a tag.
- Enter edit mode of ActionTask Builder from the button and click the Tags panel.
- From the list of available tags, select the tag you wish to add and click Add Tag.
- Click the Save icon or select Save from File drop-down menu or press Ctrl + S.
Updating Tags list for ActionTasks
If the Tags Definition page and the ActionTask Builder are opened simultaneously and a tag has been updated or a new one has been added from Tags Definition, then you have to refresh the Add Tag list in ActionTask Builder by following these steps:
- Open the ActionTask.
- To edit the ActionTask Builder, click the button.
- Click the Tags tab.
- Click on the Refresh Tag button.
Removing Tags from ActionTasks
- Open the ActionTask
- To edit the ActionTask Builder, click the button.
- Click the Tags tab.
- Select the unwanted tag.
- Click the Remove icon.
- Click the Save icon or select Save from File drop-down menu or press Ctrl + S.
If a tag is already added to the Actiontask (either current edits or pre-existing) and you delete or modify the tag via the Tags Definition page, you need to reload the ActionTask Builder page using the Reload button.
Executing an ActionTask
You can execute an ActionTask outside of an automation. There are two ways to to that.
Using Content Management
Take these steps to execute an ActionTask using the Content Management menu:
- From the Main Menu, select Content Management > All ActionTasks.
- In the list, click the View Details icon in front of the ActionsTask that you want to run.
The ActionTask Builder load in read-only mode. - Click the Execute icon in the top right corner.
- Set the execution options as explained in the table below and finally click Execute.
| Commands | Description |
|---|---|
| New Worksheet | Radio button that selects a new worksheet. |
| Current Worksheet | Radio button that selects a current worksheet. |
| Debug | Debug information can be built into the Groovy code of a REMOTE-type ActionTask and displayed when the task is executed in "Debug" mode. DEBUG statements (DEBUG.println) and log output from the task execution are shown on the "Debug" tab of the worksheet. Debug statements only get printed when an ActionTask is running in Debug mode. |
| Mock | ActionTasks should be tested independently from other tasks, if possible. Use direct execution from the editor toolbar (via the "Play" icon ) and try all variations of input values. The Mock options are helpful for this purpose. |
| Params | PARAMS are values "entering" a Runbook from the worksheet. There are two commands to Add/Remove the Name and Values added. |
Using Automation Designer
You can execure an ActionTask while designing an Automation without executing the full Automation.
- In Automation Designer, select a Task that is already laid out on the canvas.
- In the Task Properties panel on the right, click the Execute button next to the Task Name field.
You can only execute the latest version of the ActionTask. Any time you open a Task, the latest version is loaded. If you are using an older version of the ActionTask, you will be prompted to load the latest version.